

Deadlifting is essential if you want to one day achieve a great physique in the gym. However, it is an exercise that is not usually done very often due to how difficult it is to achieve correct technique.
The deadlift is one of the 4 basic multi-joint exercises that exist in bodybuilding (the others are bench press, military press and squats). It is an exercise that consists of lifting a weight that is normally very heavy, grabbing it with the arms and lifting it up to the abdomen, propelling ourselves with our legs. Said like this it seems easy but it is very common to observe a number of errors that can injure you.
A poorly performed deadlift can lead to back injuries, to shoulder injuries, through injuries to the legs and wrists. In addition, being an exercise where you put a lot of weight and few repetitions, there is much more risk of injury than in other exercises.
In contrast, a well-performed deadlift strengthens virtually every muscle in the body, especially the back, forearms, and back of the leg. It will also help you secrete a large amount of growth hormone, which you already know is key to muscle gain.
What do you need to deadlift?
- A bar and some discs.
- Patience.
Deadlift Instructions
- How to proceed:
Before talking to you about the deadlift technique, we are going to see how we are going to guide it for training. I recommend doing deadlifts only every 15 days due to how enormously exhausting it is, I recommend doing it the day you train your back, since on leg day you already have the squat as a big exercise and on chest and shoulder day you have the military press and the bench press. We are going to do 2 warm-up sets with low weight and high repetitions to prepare the body to perform the exercise. Then we are going to do 3 series of work, two of them of approach increasing the weight progressively until a final series with a lot of weight and few repetitions (from 1 to 5). We will have to make strength progressions and set ourselves to exceed a strength goal in dead weight, since the more strength, the more muscle. - Phase 1: The grip:
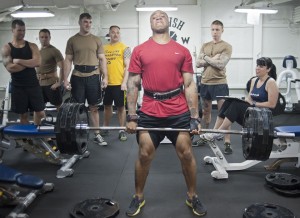
As we can see in the photo below, you have to bend down bending your knees to grab the bar with both hands. The back is not rounded and we are very close to the bar, with the toes under it. The grip should be at the width of your shoulders and in lifting with a lot of weight, we can use a mixed grip (one hand with a pronated grip and the other in supination), but as a general rule we will use the pronated grip. We must also lower the butt as much as we can since we are going to make leverage with it. - Phase 2: Go up:
Now we must pull with all our strength upwards, making force with our legs and abdomen to raise the bar. We will keep the bar close to us so as not to lose power, the back should never arch and the arms really only hold the bar (the force is really done with the leg), but they must hold tight to prevent it from falling to the ground. Once we go up, we fit the bar in the abdomen and we will have finished the movement. - Phase 3: Lower:
We start from the position of the image, now our objective is to lower the bar to the bottom, to perform a new repetition. You should lean forward a little without arching your back and at the same time bend down using your legs to the ground in order to place the bar on the ground. If you are going to do more than one repetition, just touch the bar to the ground, without letting go, go back to phase 1 and repeat all the phases of the exercise.
Deadlift tips
- Patience: There are people who get desperate because even if they manage to put a lot of load in deadlift, they do not achieve a perfect technique. You see them arch their backs, that they don’t insert the bar well, that they don’t go down well… That’s because you’re putting too much weight, which even if you achieve benefits with it, you could injure yourself. For this, it is better to be a person with patience and move only the weights that you are capable of moving with perfect technique, which you are going to polish little by little.
- Lowering Trap: If your gym owner allows it and you only go for one rep, you can afford a small trap that will prevent you from lowering the bar to the ground. When you come all the way up into the deadlift, instead of lowering the bar to the ground, let go and drop the bar. You just have to be careful with your feet and not to break the gym floor, which is common when handling large loads.


